How to lazy load images, videos and iframes with JavaScript
Lazy load is a great way how to improve a website’s performance. There are few ways how you can achieve that.
In this article you’ll learn about:
- HTML loading attribute
- Intersection Observer API
- Using lazy load libraries
- How does lazy loading affect SEO?
- What about Accessibility?
- Conclusion
Lazy loading is a term for loading resources asynchronously. This means that an image, video, iframe, or any other media will load only then when it will appear in the viewport (user scrolls to it).
This way you can make your website initial load faster, and show user media content on-demand instead of loading all at once.
1. HTML loading attribute
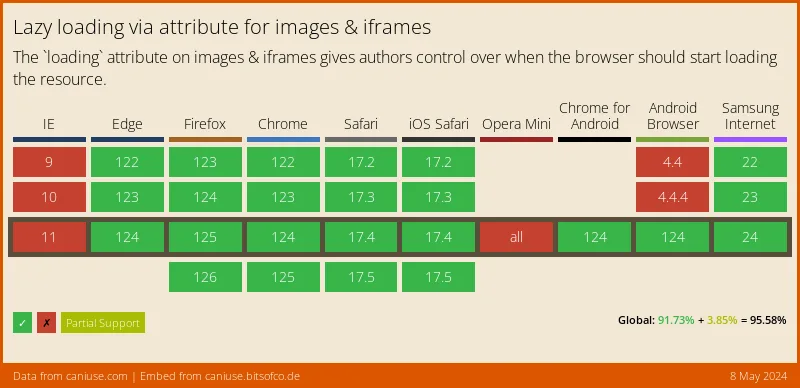
One of the ways to lazy load content is the loading HTML attribute. This attribute will work only on img and iframe elements and will tell the browser to load them only when a user scrolls near them.
<img loading="lazy" src="funny-cat.png" alt="Funny Cat">
<iframe loading="lazy" src="http://external-site.com" title="External Site"></iframe>
The loading attribute allows three possible values:
lazy- will load resource on demand;eager- will load resource immediately;auto- will use the browser default value (eager).
This approach is native and much preferable, as you are not required to load additional resources like JavaScript. Also, it doesn’t require any fallback solution in case JavaScript is disabled by the user, images will load in a regular flow.
However, it still lacks cross-browser compatibility. But it is the future, and eventually, it will become the default way to lazy load images and other resources. So make sure to keep an eye on it.
Browser Support:
2. Intersection Observer API
While loading attribute is yet to become the default way to lazy load resources, JavaScript provides a Vanilla way to do so with an Intersection Observer API.
The Intersection Observer API provides a way to asynchronously observe changes in the intersection of a target element with an ancestor element or with a top-level document’s viewport.
- MDN
Unlike loading attribute, you can use IntersectionObserver to lazy load images, videos, audio, iframes, background images/video, and basically any media you can think of.
How does it work?
The Intersection Observer API utilizes an IntersectionObserver() constructor, that creates an object with passed options and methods to trigger observation of elements intersecting device viewport.
The IntersectionObserver() constructor accepts two parameters, a callback function and an options object.
const observer = new IntersectionObserver(callback ,options);
Callback function
A callback function is called when the percentage of the target element is visible crosses a threshold. The callback accepts two parameters entries and observer.
The entries are an array of IntersectionObserverEntry objects, each representing one threshold that was crossed.
The observer is the IntersectionObserver for which the callback is being invoked.
const callback = (entries, observer) => {
  entries.forEach(entry => {
    // Each entry describes an intersection change for one observed
    // target element:
    //   entry.boundingClientRect
    //   entry.intersectionRatio
    //   entry.intersectionRect
    //   entry.isIntersecting
    //   entry.rootBounds
    //   entry.target
    //   entry.time
  });
};
Options object
This is an optional parameter that holds properties that customize the behavior of the observer. There could be three properties root, rootMargin, threshold.
const options = {
  root: document.querySelector('.images-section'),
  rootMargin: '0px',
  threshold: 1.0
}
The root property is an element that should be a parent of the target element, whose bounding rectangle will be considered the viewport. The default value is the browser viewport if no element is specified or if null.
The rootMargin property is a string value that specifies an offset of the root element. The default value is all zeros.
The threshold property specifies a ratio of intersection area to total bounding box area for the observed target. A value of 0.0 means that even a single visible pixel counts as the target is being visible. 1.0 means that the entire target element is visible. The default value is 0.
Example
To lazy load images, let’s add a lazy-image class and a data-src attribute with a path to each image element we want to lazy load.
...
<img class="lazy-image" data-src="https://path.to/image-1.png" alt="Image one" />
<img class="lazy-image" data-src="https://path.to/image-2.png" alt="Image two" />
<img class="lazy-image" data-src="https://path.to/image-3.png" alt="Image three" />
...
For the JavaScript part, we’ll need to select all images on the page. Create a new IntersectionObserver object. We will pass only the callback function, options can be default.
Inside the callback, we check each entry (image) for an isIntersecting property, if it values to true then we assign src attribute, remove class and tell the observer to unobserve.
const images = document.querySelectorAll('.lazy-image')
const imageObserver = new IntersectionObserver((entries, observer) => {
  entries.forEach((entry) => {
    if (entry.isIntersecting) {
      const image = entry.target
      image.src = image.dataset.src;
      image.classList.remove('lazy-image')
      imageObserver.unobserve(image)
    }
  })
})

images.forEach((image) => {
  imageObserver.observe(image)
})
Browser Support:
3. Using lazy load libraries
There are some libraries that do all the job for you. So you don’t have to write lazy loading functionality from scratch.
Each of these libraries allows you to install it via package manager or include it directly via script with CDN image.
- Lazy Load Remastered - is a modern vanilla JavaScript version of the original Lazy Load plugin. It uses Intersection Observer API to observe when the image enters the browser’s viewport.
- lozad.js - Highly performant, light ~1kb and configurable lazy loader in pure JS with no dependencies for responsive images, iframes and more, using IntersectionObserver API.
- Vanilla Lazy Load - LazyLoad is a lightweight (2.4 kB) and flexible script that speeds up your web application by deferring the loading of your below-the-fold images, videos and iframes to when they will enter the viewport. It’s written in plain “vanilla” JavaScript, it leverages the IntersectionObserver API, it supports responsive images, it optimizes your website for slower connections, and can enable native lazy loading.
- yall.js - is a featured-packed SEO-friendly lazy loader for
<img>,<picture>,<video>and<iframe>elements, as well as CSS background images. It works in all modern browsers, including IE 11. It uses Intersection Observer where available, but as of version 3, this API must be polyfilled for older browsers.
4. How does lazy loading affect SEO?
To answer shortly lazy loading has a positive impact on SEO. Google actually recommends using lazy loading for images as it directly impacts site performance. It is one of the elements of the user experience which is a ranking factor.
Besides the performance aspect, you may be wondering will Google index images that are lazy loaded? The answer is yes it will crawl the page and index lazy loaded images. Google advises making your website load fast and you shouldn’t have any issues with indexing/crawling images.
5. What about Accessibility?
As you may or may not know, some users disable JavaScript in their browsers. There are various reasons for this, but it’s a good practice to handle cases like that and make your website accessible.
To do so you should use the noscript tag.
The HTML
<noscript>element defines a section of HTML to be inserted if a script type on the page is unsupported or if scripting is currently turned off in the browser.- MDN
You can specify the element that gets lazy-loaded inside the noscript tag as a fallback, to show up in case JavaScript is disabled. So for the image element, it should look as follows:
<img class="lazy-image" data-src="https://path.to/image-1.png" alt="Image one" />
<noscript>
  <img src="https://path.to/image-1.png" alt="Image one" />
</noscript>
But in this case, you’ll see an image that is not loaded (due to missing src attribute) as well. You must hide it to prevent unwanted results on the page. It can be achieved with the same noscript tag.
At the top of your document, right after the head closing tag you can another noscript tag with a style to hide all elements that get lazy-loaded.
<noscript>
  <style>
    .lazy-image {
      display: none;
    }
  </style>
</noscript>
Conclusion
Adding lazy loading to your page is not that hard as it may sound. However, you may want to spend some additional time experimenting and testing the best solution for your case. It’s a great way to optimize images on your page to boost performance.
Make sure to come back to this article if you forget something or use it for reference in your future work.